February 25, 2015

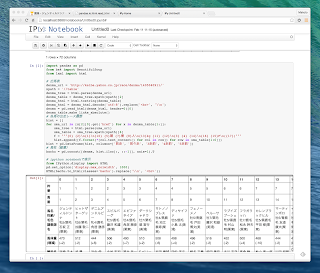
Yahoo!競馬の情報から直近5走のデータを取得して縦馬柱をipython notebookで表示する


ipythonとpandasとlxmlをインストールしておいてipython notebookを起動

pip install ipython\[all\]
pip install pandas
pip install lxml
ipython notebook

でnotebook上で

import pandas as pd
from lxml import html
# 出馬表
denma_url = 'http://keiba.yahoo.co.jp/race/denma/1405040911/'
xpath = '//table'
denma_tree = html.parse(denma_url)
denma_table = denma_tree.xpath(xpath)[2]
denma_html = html.tostring(denma_table)
denma_html = denma_html.decode('utf-8').replace('<br>', '\\n')
denma = pd.read_html(denma_html, header=0)[0]
denma_table.make_links_absolute()
# 各馬の出走レース履歴
hist = []
for uma_url in [x[2].find('a').get('href') for x in denma_table[1:]]:
uma_tree = html.parse(uma_url)
uma_table = uma_tree.xpath(xpath)[6]
f = """{0} {2}
{1}
{10} {5}頭 {7}番 {8}人
{13}kg {11} {12}
{3} {4} {14}
{16} {15}F
({17})"""
hist.append([f.format(*[col.text_content() for col in row]) for row in
uma_table[1:6]])
hist = pd.DataFrame(hist, columns=['前走', '前々走', '3走前', '4走前', '5走前'])
# 縦馬柱
bachu = pd.concat([denma, hist.iloc[:, ::-1]], axis=1).T
# ipython notebookで表示
from IPython.display import HTML
pd.set_option('display.max_colwidth', 1000)
HTML(bachu.to_html(classes='bachu').replace('\\n', '<br>'))
view raw gistfile1.py hosted with ❤ by GitHub

to_htmlでclassも設定できるのでhtmlファイルに吐き出した後cssつければ見やすくできるかも.表示だけじゃなくてpandasでデータ処理して色々すればおもしろいか.勝馬予想するとかdoc2vec使って名前で配合するとか.

February 4, 2015

doc2vecに類似ラベル・ワードを探すメソッドの追加

word2vecはワードに対してベクトルを割り当てるが、doc2vec(aka paragraph2vec, aka sentence embeddings)は各ドキュメントに付けられたラベルに対してもベクトルを割り当てる。

gensimのdoc2vecはword2vecの拡張としてDistributed Representations of Sentences and Documentsの実装されている。チュートリアルはこれ

似ているワードやドキュメントを取ってくるmost_similarというメソッドがあるが、ワードなのかラベルなのかは区別されない。そこで元のプロジェクトをフォークして限定して取得できるようにした。

satomacoto/gensim

フォーク先のブランチからインストールためにはzipを使ってpip install。


追記 2015/2/5

negativeオプションが効かなかったのを修正。

$ pip install -U https://github.com/satomacoto/gensim/archive/doc2vec-mostSimilarWordsAndLabels.zip

追加したメソッドはmost_similar_labelsとmost_similar_words。またワードのリストのリストをドキュメント群としてみなすためにLabeledListSentenceクラスを追加。各ドキュメントには順番にSENT_0, SENT_1…とラベルが振られる。ラベルは複数振ることができるのでクラスは自分で書いたほうがいいかも。実装はこれ

以下サンプル。

>>> import gensim
>>> sentences = [
... ['human', 'interface', 'computer'], #0
... ['survey', 'user', 'computer', 'system', 'response', 'time'], #1
... ['eps', 'user', 'interface', 'system'], #2
... ['system', 'human', 'system', 'eps'], #3
... ['user', 'response', 'time'], #4
... ['trees'], #5
... ['graph', 'trees'], #6
... ['graph', 'minors', 'trees'], #7
... ['graph', 'minors', 'survey'] #8
... ]
>>> labeledSentences = gensim.models.doc2vec.LabeledListSentence(sentences)
>>> model = gensim.models.doc2vec.Doc2Vec(labeledSentences, min_count=0)
>>> model.labels
{'SENT_5', 'SENT_0', 'SENT_2', 'SENT_3', 'SENT_6', 'SENT_4', 'SENT_1', 'SENT_8', 'SENT_7'}
>>> model.most_similar_labels('SENT_0')
[('SENT_7', 0.09040503203868866), ('SENT_8', 0.05388247221708298), ('SENT_3', 0.018625225871801376), ('SENT_6', 0.0021968595683574677), ('SENT_2', -0.005669509992003441), ('SENT_1', -0.034463658928871155), ('SENT_5', -0.044474877417087555), ('SENT_4', -0.11045961081981659)]
>>> model.most_similar_words('human')
[('eps', 0.0804225355386734), ('system', 0.0298603605479002), ('graph', 0.024964405223727226), ('user', 0.020017698407173157), ('computer', 0.00942305475473404), ('interface', 0.006561885587871075), ('response', -0.0009844079613685608), ('time', -0.02301063761115074), ('survey', -0.049963727593421936), ('trees', -0.11870135366916656)]
>>> model.most_similar_words(positive=['SENT_0', 'SENT_1'], negative=['SENT_2'], topn=5)
[('human', 0.10655776411294937), ('response', 0.0948006808757782), ('interface', 0.07383717596530914), ('eps', 0.04268331080675125), ('graph', 0.02581930160522461)]
view raw gistfile1.py hosted with ❤ by GitHub
SENT_0と一番に似てるのはSENT_7ということだが…

February 3, 2015

VagrantにPylearn2の環境を作りipython notebookで使う

Pylearn2のOther methodsにあるようにVagrant, VirtualBox
を使って試せるようにする。そしてipythonのすべてをインストール。
git clone git@github.com:ironchief/pylearn2_vagrant.git
cd pylearn2_vagrant
vagrant up
vagrant ssh -- -L 8888:localhost:8888
sudo pip install ipython\[all\]
ipython notebook
あるいはsshで入れるようにするときはVagrantfileに
config.vm.network "forwarded_port", guest: 8888, host: 8888
を記述してvagrant upvagrant reloadして
vagrant ssh
ipython notebook --ip=0.0.0.0
とする。
起動が確認できたらブラウザから http://localhost:8888 にアクセスする。

References